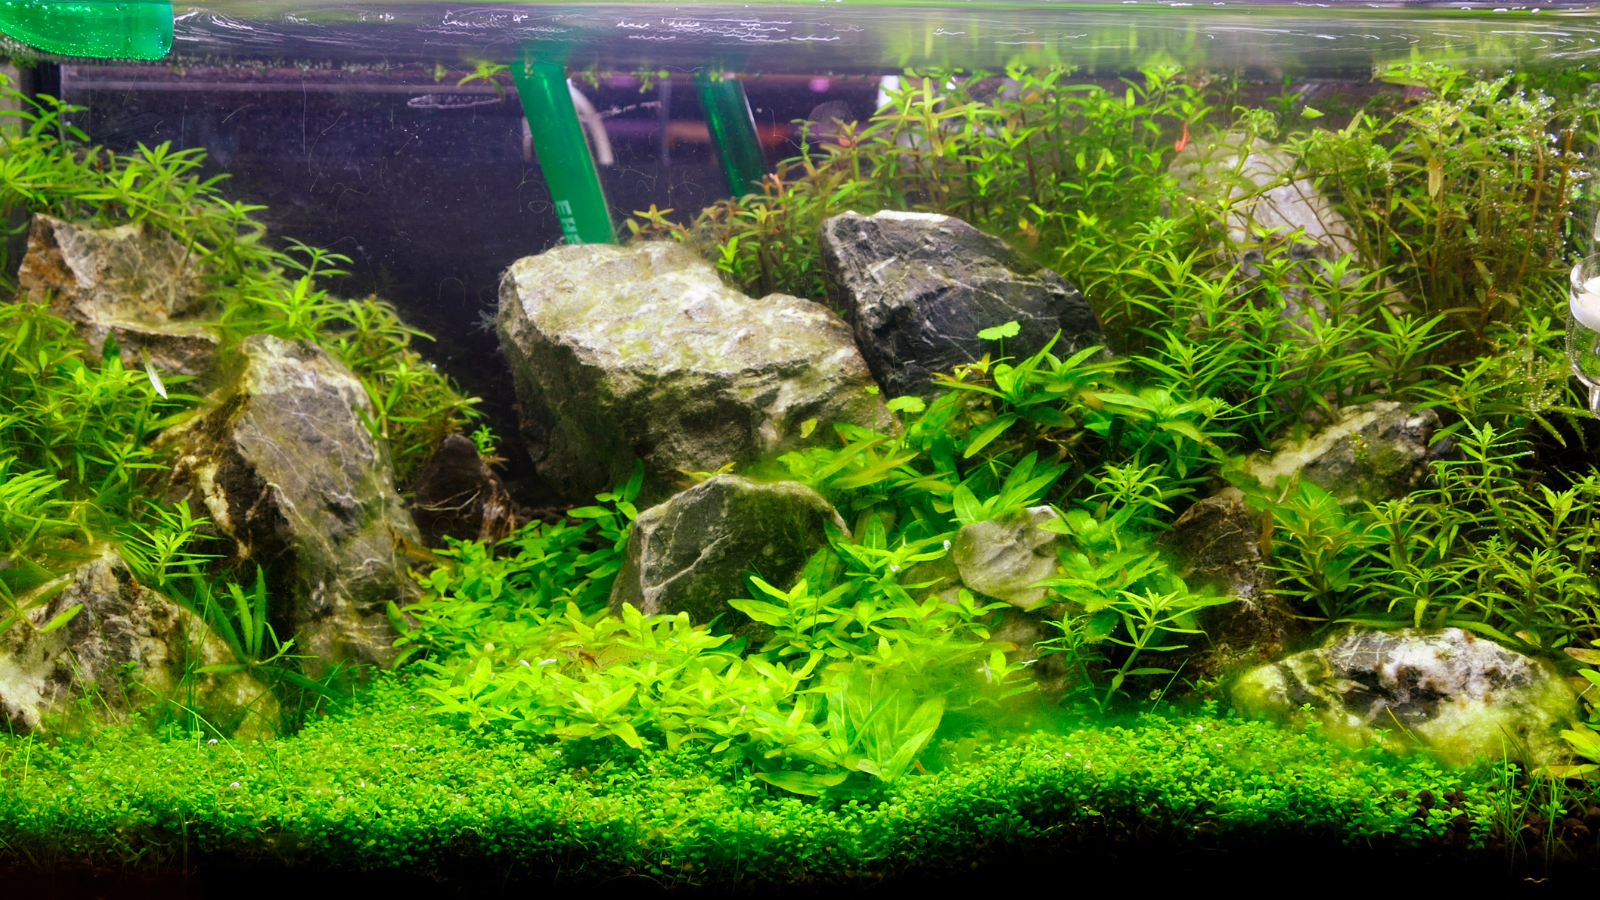
Mastering CO2 is the most important skill in a high tech planted tank. Plants use the energy of light to strip Carbon from Carbon Dioxide. The Carbon is then used to fabricate Carbohydrates. Sugar is a fundamental Carbohydrate and plants combine Phosphate with Carbon to build a nutritious sugar. It is this Phosphate Sugar that is used for growth and reproduction. The sugar is so important that any reduction in the supply of Carbon is felt immediately by the plant, which reacts negatively to the loss of the precious Carbohydrate. As the light intensity increases, the need for more sugar increases rapidly.

Maintaining proper levels of CO2
The problem associated with maintaining CO2 concentration level is that gasses do not move as easily in water as they do when dissolved in liquids. The gas diffusion rate across cell boundaries can be as high as 10,000 times slower in water than in air. Therefore, even minor changes in CO2 injection rates, or minor increases in light intensity have a significant detrimental effect on the plants ability to gather enough CO2 to fabricate Carbohydrate.
The higher the temperature of the water, the less soluble CO2 is. Since most planted tanks are tropical tanks this makes it even more difficult. It’s been estimated that approximately 90% of the gas being injected into the tank is immediately lost to atmosphere. 10% or less makes it into the plant.
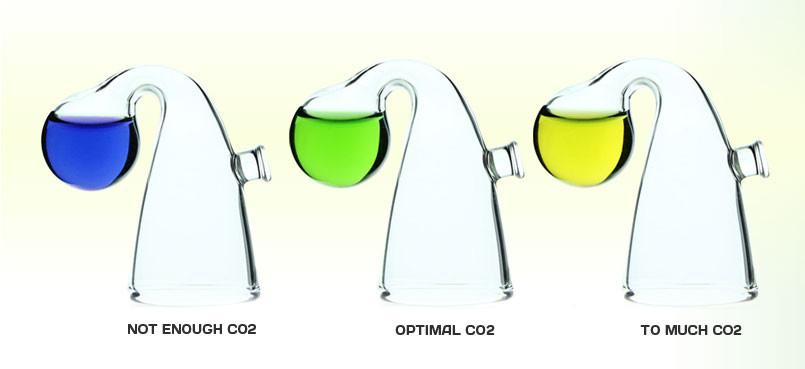
What does a drop checker tell us?
The drop checker is nothing more than a pH test kit, despite the grand claims on the packaging such as "Long Term CO2 Indicator". Many hobbyists already own a pH test kit which typically, shows blue if the water sample is alkaline (> pH7), green if neutral (=pH7) and yellow if acidic (<pH7). These colors are typical when the reagent in the pH test kit is Bromothymol Blue. What we are hoping is for the checker to show us the pH at which we have carbonated the tank water high enough to satisfy the plants' demand, but low enough to be non-toxic to fauna. Most agree that the nominal concentration level for highly lit tanks is at or around 30 ppm.
The relationship between CO2, pH and kH
When CO2 dissolves in water a small portion of it, less than about 0.2% combines with the water to form Carbonic Acid. As more CO2 dissolves and combines with water, the more the pH will drop.
pH is an upside-down measurement A pH rise from 6 to 7 indicates a tenfold decrease in the acid concentration. A pH drop from 6 to 5 indicates a tenfold increase in the acid concentration.
kH is referred to as "carbonate hardness" and is a measure of the “equivalent” amount of carbonate and bicarbonate in the water. These are coincidentally the same type of products which occur as the Carbonic acid are formed by CO2 injection. If, however, the water already contains carbonates and bicarbonates, the effect is to neutralize the acid. Carbonate and bicarbonate therefore act as "buffers", to keep the pH higher even as more CO2 dissolves in the water. It is for this reason kH is also known as a measure of the "alkalinity" of water (alkalinity=high pH).
The relationship in practical terms therefore is that if Hobbyist "A" has tap water measuring ph 7.2 and kH 10 ( high levels of carbonate and bicarbonates) then 30 ppm of dissolved CO2 may only cause his pH to drop to 7.0
Conversely, Hobbyist "B" has tap water also measuring 7.2 but kH 6. More acid can form in his water (because of less carbonate and bicarbonate levels), so 30 ppm dissolved CO2 in his water will result in a pH drop to 6.8.
If hobbyist "B" suddenly added sodium bicarbonate to his water, his kH would rise. No CO2 would be lost. He would still have 30 ppm CO2 dissolved but the bicarbonate would bond to more acid in the water and he would immediately see a pH rise. This property of carbonate/bicarbonate is exactly why sodium bicarbonate is used to neutralize stomach acids when we overeat.
Why tank water should not be used in the drop checker
If dissolved CO2 were the only source of acidity in the tank it would be a simple matter to measure the pH and use the equation/chart to determine CO2 levels. Unfortunately this is almost never the case. There are many acid and alkaline sources in the tank varying from urine and ammonia to phosphates we ourselves add as nutrients. The pH measured in the tank is therefore unreliable because it does not accurately reflect the acid caused by CO2 dissolving in water alone.
The accepted practice is to fill the drop checker with distilled /deionized/RO water that has been adjusted to a known kH value. In this way the drop checker water is isolated from the tank water and only reacts to direct contact with CO2 evaporating from the tank into the checkers air bubble and then into the water sample. It was reasoned that a distilled water sample adjusted to a carbonate hardness of 4 dkH a 30 ppm concentration results in a pH of approx 6.6 which, using the reagent of a pH test kit in the drop checker turns the water sample in the checker green. 4dkH water has now become the standard solution for drop checkers, however 5 dkH can be used as well. With a 5 dkH a green color (6.6 pH) will indicate 38 ppm. These solutions can be made but AE also sell it.
How is the checker assembled and mounted - Are all drop checkers equal? Drop checkers come in various sizes, shapes and materials such as plastic or blown glass. The more exotic, the more expensive. Blown glass is valued as it adds an aesthetic appeal to the tank when mounted. There is no difference to the dropcheckers performance due to geometry of the shape. Sometimes the shape and construction makes it difficult to read the colors.
Some dropchecker kits are sold with pH reagent plus 4DKH water separately. Other kits sell a pre-mixed liquid that combines the two. Either way will work but the mixture is more convenient.
- Using the syringe, pull 1.5 ml of the 4dkH (or 1.5 ml of the pre-mixed liquid) from the bottle and transfer to the dropchecker bowl.
- If the reagent is separate to the water squeeze 3 drops of the reagent into the vessel and shake gently. The solution will turn a blue-green indicating a pH of around 7.
- Now invert the assembly being careful not to spill the fluid
- Next, holding it level, mount the checker anywhere on the front glass inside the tank so that air is trapped in the vessel.
Should I turn off the gas at night?
Turning off the gas is optional and many prefer this method because it can really stretch your CO2 supply out by up to double. CO2 is only used when there is light. The oxygen consumed by the plants compete with the compete with the fauna. If the gas is turned off it gives them a break and the peak level can be driven higher during the photoperiod. The penalty of ON/OFF method of course is an added layer of complexity. You'll need a solenoid and timer.
Zeroing in on 30 ppm
Drop checkers' color change response is slow for many legitimate reasons. In the morning, after you've turned on the gas, the checker color is only telling you what the CO2 concentration was an hour or two ago. At some point during the day, the CO2 concentration in the tank arrives at, and stabilizes at it's maximum (injection rate minus evaporation and plant consumption). An hour or so after that, there is an equilibrium of CO2 concentration in the tank, in the bubble and in the checker's water sample. This process may take 4 or 5 hours so you have to be patient with the drop checker and with the adjustment of your bubble rate. If you lose your nerve too early because the color isn't changing fast enough you turn up the gas and a few hours later the fish suffer and the checker turns bright yellow. You see the fish suffer and turn down the gas then the plants may suffer. This is the yo-yo effect many suffer and can often induce algae.
You need to use the drop checker systematically and with patience. Give yourself some time like on a weekend when you are home to observe. Use 4 dkH water. Set your initial bubble rate and observe the color changes throughout the day. Find the maximum stable concentration color and note the time of day it occurred. If that color is too blue make a minor adjustment by increasing the bubble rate and leave it there for another day. Note the maximum again and make another minor adjustment if necessary. Remember that most fish can tolerate a limeade green or even into the yellow if you turn off the gas. You will find that with a covered tank you can turn the gas off 2 or 3 hours before lights off. In the morning the checker may still show in the green. No problem, turn on the gas an hour or two before lights on. If you are patient and methodical, you'll find that you'll consume a lot less gas because your timing will be right. It's much more important that your concentration is up to nominal level in the morning when lights first go on. In the afternoon the concentration has maxed out and the plants are on cruise control. Nearing the end of the day you can throttle back but there is still plenty of gas dissolved and the plants are beginning to lower their consumption.
Initial bubble rate - disclaimer
No two tank setups are exactly the same. It's therefore impossible to suggest with any accuracy what initial bubble rate each individual should set. Different regulator/bubble counter combinations produce different sized bubbles. Many other factors affect the tanks absorption rate. The following arbitrary initial rates have been offered and should be used carefully in conjunction with the procedures above:
40 to 60b gallon 1 bubble per second,
20 to 40 gallon 1 bubble every 2 seconds
10 to 20 gallon 1 bubble every 5 seconds
Remember to not get tunnel vision and become hypnotized by bubbles in the counter - the values shown are just a guide and are provided simply for orientation.
When should the reagent be replaced?
The standard practice is to clean the vessel and to replace the drop checker fluids whenever a water change is performed, typically once a week. Other factors affecting CO2 availability to plants If we could visually detect CO2 in a tank we would see that the distribution is uneven. The plant in the upstream area of the flow has greater access than the plant directly behind it downstream. Flow and distribution are not discuss nearly enough but they are as critical as bubble rate and peak concentration. It is often stated that a planted tank should be filtered at a turnover rate of between 3 to 5 times the tank volume per hour. The problem is that no filter ever delivers it's rated flow at typical configurations once loaded with media. Canister filters and sump pumps have to fight gravity as well. Add a CO2 diffuser/reactor and one would be fortunate to get 50% of rated flow.
When deciding on filtration for a tank aim for 3X tank volume, assume 50% loss and choose the model based on these revised numbers. A 200 L tank should be filtered at 600 L/hour, but that means a filter (or filters combined) rated at 1200 L/Hour. If that is not feasible, due to space or cost, then consider an alternative by adding a powerhead to deliver flow to the plants. A good indication of proper distribution is when most or all individual plants "sway in the breeze".
In-Line Devices versus In-Tank Devices
For tanks less than about 30 US Gallons (120L) the in-tank diffusers work well as the volume of water is not excessive, however, as the tank size increases it becomes more viable to use an external device. This also looks neater in the tank as it reduces clutter.
Some external devices as known as “Atomizers” as they release very small bubbles and a fog or mist appears in the tank. Some find this annoying. A compromise can be to place the in-tank device at the filter inlet grill and to allow the filter to swallow the bubbles. The filter will break up the bubbles so that there is no mist.